Electrical Tip of the Day: How to wire an outlet (Part I – The WRONG WAY)
What is a number #1 cause of electrical fires in residential occupancies?… failed wire terminations on devices We see this a lot – typically in older homes with outdated / damaged devices, first generation modern construction homes form the 7o’s, and today in the fast paced new construction track home market.
A friend of mine who recently had this exact issue at his home suggested that we show the correct way to wire an outlet, with an example of the wrong way it can be done and what that might look like.
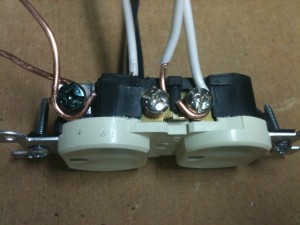
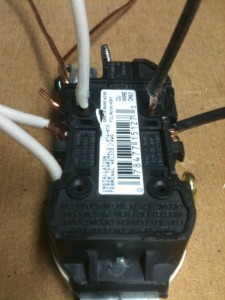
First – the wrong way. Here is a picture of an outlet I made up here at the shop to demonstrate a number of deficiencies and bad practices:

 In these two pictures you see a number of issues:
- (2) ground wires terminated on one screw – each screw on an outlet or switch is to have
ONLY ONE WIRE
on it
- Wires that have been stripped back two far that allow exposed conductor to extend from the device
-
STAB IN THE BACK
connections – this is a big one, this system is simply a failure waiting to happen. Don’t use the stab in the back holes on a device! Most reputable electrical contractors will not use the stab in the back system. We use a method called “pig tailing” which we will talk about in Part II of this topic
- Wires landed on a screw that are not properly tightened or terminated – you should not be able to wiggle a wire loose on a device. Conductors should be bent and trimmed to fit neatly around the screw heads
So there are some examples of the wrong way / things to look for. IF you see this kind of wiring on an outlet, or wires at a device location that appear to be loose, burnt, cracking. overheated, or otherwise “messy” it is a good idea to get it looked at now. Fires are really hard to fix later 🙂